

I'm back, we've moved, and I'm overloaded with projects. It's exciting but also exhausting. I'm really trying to prioritize so I can show you some finished spaces, but it seems like every room needs a tweak or final piece of the puzzle, so, I'll show you one of the first things we did at the new place: building a door for my basement office.
Since we've moved in, I've been using the guest room as my side office, with that beautiful wood and faux marble top desk from my last post. It's been fine, but it wasn't going to be permanent. Part of why we went with this house is because it has separate spaces for everyone. In the Silver Spring suburban house, my office was only a guest room occasionally, with a bed that could fold up and be put away between guests. Here, given the current pandemic and uncertain timeline, the office needed to not do double duty, have room for my larger desk as well as a door for privacy when I'm working and when the cats leap the gate to crash the party.
Next was figuring out what the right door for the space would be. I looked at multiple door types, including accordion doors, bi-fold closet doors, and pivot doors, because the opening was wider than a standard door and because we didn't want anything permanent, given this is a rental. I kept returning to the sliding barn doors as a good cost effective custom DIY option.
The main tutorials I used were from:
Cabana State of Mind, who also referenced a very useful tutorial on Remodelaholic from Chantel from Over-Inspired.
I also drew some inspiration from the look of the door below, available on Etsy. But my door hasn't quite gotten there yet. I'm going to give it some time to mature before I get all fancy. But it still looks GREAT and was REALLY EASY!

I started out with the measurements, making sure my planned door was AT LEAST 2 inches wider than the opening AND making sure the ceiling mount hardware set I ordered had a track at least double the width of the door. I would actually say to go as wide with the door as you can because it gives the illusion of privacy. But I couldn't go wider without buying a longer track and it wasn't going to have much room on the left side of the opening so it would be a asymmetric close, which I didn't like.
I then ordered this SUPER CHEAP tongue and groove flooring at Home Depot. I wanted to make sure both sides of the door looked good and, as promised by the tutorials above, it had a beadboard look on the opposite side that was perfect. We did a measurement in place and then the hubs cut it down for me to the exact specifications from our ceiling mount hardware to give us a 1 inch clearance above the floor. Which was very useful, because our floors aren't level. Yes, we found this out the hard way, BUT the 1 inch clearance meant we didn't have to change anything, it just stopped the door from sliding any further. I stuck a few boards together and did a test fit below. You see I was working around the smoke detectors and that there was no room for the door on the other side of the opening.

As you can see from this shot, I forgot to take pictures of the space in advance for the blog. You can also see that there's NO WALL above the door, which meant I had to return the initial wall mounted hardware I excitedly bought before we had even moved in. Sigh.
Anyway, following the tutorials above, I glued the boards together to my desired width of 8 boards. The wood was less than $60! I bought the same wood glue as the tutorials above and laid out the pieces on the floor. I agree with Chantel that the glue leaks out less if you stop 5 inches or so before the ends of the board but the hubs has a heavy hand so glue of course leaked out in some parts anyway. I was able to do most of the boards by myself, but he had to help at the end when I was joining some of the larger pieces. We didn't have clamps long enough to use for the door width, so we tied rope around the pieces overnight, which worked well. JUST GLUE. NO NAILS OR SCREWS.

Notice anything off here? This is another thing that happens when you recruit the hubs to do the cutting and don't go over everything in extreme detail with him. He cut the wrong end off the final board and I glued it together without noticing. DOH. We're both at fault, but since he was doing me a favor, I should've been more specific.
Still, I thought it looked pretty good and hoped (prayed really) that no one would notice this glitch. He also cut the trim pieces for me which we were able to measure of the door and get it exactly right (and which covered up the board mistake on one side of the door). I waited 24 hours for the door to dry and then added the trim the next day. I was able to get clamps over the trim except in the middle where I used a medical textbook and paint can and gave it 24 hours to dry as well.

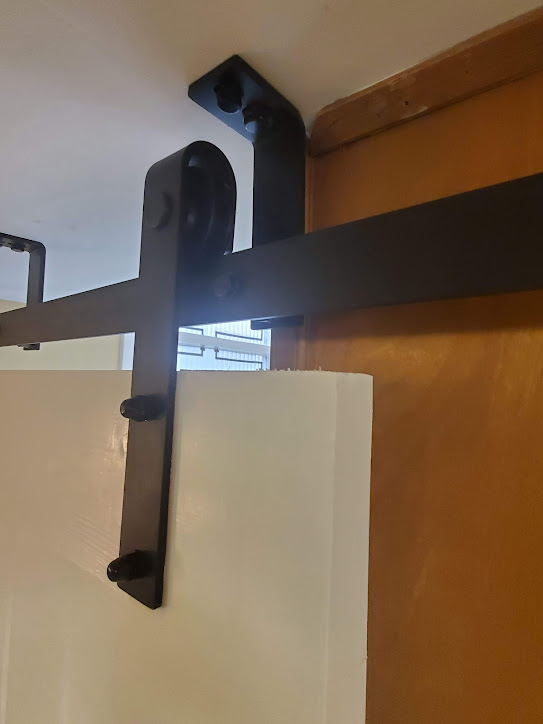
We started working on the hardware next. I used this ceiling mount barn door hardware, just over double the width of my door. The directions were...useless but the pictures helped. It was basically a wall mounted kit with one page of pictures for the ceiling mount process. We did use two of the wall mounts for extra stability, but didn't need it. We also didn't put the wood dowels into the ceiling as it was going to make huge holes in the wall we didn't need. We just tried to screw into joists whenever possible. The good thing is that the door is so light with the flooring method that we haven't had any problems whatsoever. If you're doing a much heavier door, you may want to use the ceiling dowels and additional wall supports though. You also have to measure for level at every single step, like the directions say, especially if you don't want the door to slide. Ours isn't exactly level but it stays closed and stays open. It also comes with door stoppers, which were also helpful, to keep the door from going off the track. We put ours where we wanted the door to stay when it was closed.
We then put up the door and measure the door hangers directly off the hardware, using a picture frame to ensure adequate floor clearance.

I added this dual sided door handle and some wall mounted floor guides to hold it in place for when the cats inevitably jump the gate at the top of the stairs and try to come "investigate" the basement where their parents now spend a majority of their time. This will keep them from pushing and nudging it open. This is a rental, so we didn't want to use floor mounted guides. Also, I just used sticky strips to hold it in place for now, with some again the wall side and bottom and some on the other end, as I didn't want to drill into the paneling unnecessarily. Aside from my office, the finished part of the basement will hold my project space (I just told my husband to stop calling my stuff "crafts" as it much more hardcore than than 😃), a TV area with the hubs speakers for some movie watching, and his office space, which currently consists of boxes and boxes of crap. Through a door is the laundry area which leads to an unfinished basement space which is housing his workshop currently, which IS completely unpacked and functioning. Priorities, y'all. PRIORITIES.

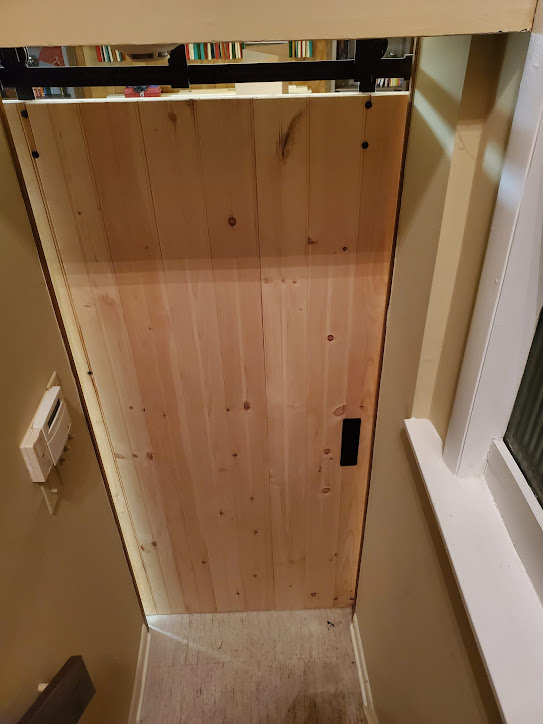
Look HOW GOOD the handle looks. Also, see how the trim covers up my "mistake" on the one side and on this side, the handle was placed on the board placed the wrong way to make the extra width seem like it was on purpose AND the extra width is partially blocked by the door close. Mmmmhmmm. Lemons. Lemonade. Get some. I am considering having the hubs detail it out with his dremel to make it look identical to the other boards, but I'm down here every day and haven't noticed a thing. Make sure to get a handle that fits the size of your door and doesn't look dinky and ridiculous. I love that this looks good AND makes sense on both sides of the door, given the minimal space on the stairway side.
I waited to attached the guides until I painted the door, since I wanted to use some extra poly protection along the bottom of the door to prevent paint peeling/wear. I was really considering navy blue (existing paint) but went with my go-two existing white paint that I used on the kitchen cart and kitchen island which matches this heirloom white spray paint. I thought the space would be too dark with its terrible lighting and wood paneling to have a navy door.
Coat 1:

Coat 1 other side:

Finished!


I haven't seen a lot of ceiling mount barn door tutorials so I hope you find this one useful. I've already made one small change since these pictures - I moved the door guide on the left in the picture above closer so that it will hold the door in place when closed. It was a little difficult to guide the door into the guide from the other side when closed, so this immediately helped. It's so smooth and so quiet. And the door is so light I can lift it on and off the track by myself.
I'll keep you updated. So many projects, so little time!
-E
Since we've moved in, I've been using the guest room as my side office, with that beautiful wood and faux marble top desk from my last post. It's been fine, but it wasn't going to be permanent. Part of why we went with this house is because it has separate spaces for everyone. In the Silver Spring suburban house, my office was only a guest room occasionally, with a bed that could fold up and be put away between guests. Here, given the current pandemic and uncertain timeline, the office needed to not do double duty, have room for my larger desk as well as a door for privacy when I'm working and when the cats leap the gate to crash the party.
Next was figuring out what the right door for the space would be. I looked at multiple door types, including accordion doors, bi-fold closet doors, and pivot doors, because the opening was wider than a standard door and because we didn't want anything permanent, given this is a rental. I kept returning to the sliding barn doors as a good cost effective custom DIY option.
The main tutorials I used were from:
Cabana State of Mind, who also referenced a very useful tutorial on Remodelaholic from Chantel from Over-Inspired.
I also drew some inspiration from the look of the door below, available on Etsy. But my door hasn't quite gotten there yet. I'm going to give it some time to mature before I get all fancy. But it still looks GREAT and was REALLY EASY!
I started out with the measurements, making sure my planned door was AT LEAST 2 inches wider than the opening AND making sure the ceiling mount hardware set I ordered had a track at least double the width of the door. I would actually say to go as wide with the door as you can because it gives the illusion of privacy. But I couldn't go wider without buying a longer track and it wasn't going to have much room on the left side of the opening so it would be a asymmetric close, which I didn't like.
I then ordered this SUPER CHEAP tongue and groove flooring at Home Depot. I wanted to make sure both sides of the door looked good and, as promised by the tutorials above, it had a beadboard look on the opposite side that was perfect. We did a measurement in place and then the hubs cut it down for me to the exact specifications from our ceiling mount hardware to give us a 1 inch clearance above the floor. Which was very useful, because our floors aren't level. Yes, we found this out the hard way, BUT the 1 inch clearance meant we didn't have to change anything, it just stopped the door from sliding any further. I stuck a few boards together and did a test fit below. You see I was working around the smoke detectors and that there was no room for the door on the other side of the opening.
As you can see from this shot, I forgot to take pictures of the space in advance for the blog. You can also see that there's NO WALL above the door, which meant I had to return the initial wall mounted hardware I excitedly bought before we had even moved in. Sigh.
Anyway, following the tutorials above, I glued the boards together to my desired width of 8 boards. The wood was less than $60! I bought the same wood glue as the tutorials above and laid out the pieces on the floor. I agree with Chantel that the glue leaks out less if you stop 5 inches or so before the ends of the board but the hubs has a heavy hand so glue of course leaked out in some parts anyway. I was able to do most of the boards by myself, but he had to help at the end when I was joining some of the larger pieces. We didn't have clamps long enough to use for the door width, so we tied rope around the pieces overnight, which worked well. JUST GLUE. NO NAILS OR SCREWS.
Notice anything off here? This is another thing that happens when you recruit the hubs to do the cutting and don't go over everything in extreme detail with him. He cut the wrong end off the final board and I glued it together without noticing. DOH. We're both at fault, but since he was doing me a favor, I should've been more specific.
Still, I thought it looked pretty good and hoped (prayed really) that no one would notice this glitch. He also cut the trim pieces for me which we were able to measure of the door and get it exactly right (and which covered up the board mistake on one side of the door). I waited 24 hours for the door to dry and then added the trim the next day. I was able to get clamps over the trim except in the middle where I used a medical textbook and paint can and gave it 24 hours to dry as well.
We started working on the hardware next. I used this ceiling mount barn door hardware, just over double the width of my door. The directions were...useless but the pictures helped. It was basically a wall mounted kit with one page of pictures for the ceiling mount process. We did use two of the wall mounts for extra stability, but didn't need it. We also didn't put the wood dowels into the ceiling as it was going to make huge holes in the wall we didn't need. We just tried to screw into joists whenever possible. The good thing is that the door is so light with the flooring method that we haven't had any problems whatsoever. If you're doing a much heavier door, you may want to use the ceiling dowels and additional wall supports though. You also have to measure for level at every single step, like the directions say, especially if you don't want the door to slide. Ours isn't exactly level but it stays closed and stays open. It also comes with door stoppers, which were also helpful, to keep the door from going off the track. We put ours where we wanted the door to stay when it was closed.
We then put up the door and measure the door hangers directly off the hardware, using a picture frame to ensure adequate floor clearance.
I added this dual sided door handle and some wall mounted floor guides to hold it in place for when the cats inevitably jump the gate at the top of the stairs and try to come "investigate" the basement where their parents now spend a majority of their time. This will keep them from pushing and nudging it open. This is a rental, so we didn't want to use floor mounted guides. Also, I just used sticky strips to hold it in place for now, with some again the wall side and bottom and some on the other end, as I didn't want to drill into the paneling unnecessarily. Aside from my office, the finished part of the basement will hold my project space (I just told my husband to stop calling my stuff "crafts" as it much more hardcore than than 😃), a TV area with the hubs speakers for some movie watching, and his office space, which currently consists of boxes and boxes of crap. Through a door is the laundry area which leads to an unfinished basement space which is housing his workshop currently, which IS completely unpacked and functioning. Priorities, y'all. PRIORITIES.
Look HOW GOOD the handle looks. Also, see how the trim covers up my "mistake" on the one side and on this side, the handle was placed on the board placed the wrong way to make the extra width seem like it was on purpose AND the extra width is partially blocked by the door close. Mmmmhmmm. Lemons. Lemonade. Get some. I am considering having the hubs detail it out with his dremel to make it look identical to the other boards, but I'm down here every day and haven't noticed a thing. Make sure to get a handle that fits the size of your door and doesn't look dinky and ridiculous. I love that this looks good AND makes sense on both sides of the door, given the minimal space on the stairway side.
I waited to attached the guides until I painted the door, since I wanted to use some extra poly protection along the bottom of the door to prevent paint peeling/wear. I was really considering navy blue (existing paint) but went with my go-two existing white paint that I used on the kitchen cart and kitchen island which matches this heirloom white spray paint. I thought the space would be too dark with its terrible lighting and wood paneling to have a navy door.
Coat 1:
Coat 1 other side:
Finished!
I haven't seen a lot of ceiling mount barn door tutorials so I hope you find this one useful. I've already made one small change since these pictures - I moved the door guide on the left in the picture above closer so that it will hold the door in place when closed. It was a little difficult to guide the door into the guide from the other side when closed, so this immediately helped. It's so smooth and so quiet. And the door is so light I can lift it on and off the track by myself.
I'll keep you updated. So many projects, so little time!
-E
No comments:
Post a Comment