Search This Blog

Saturday, December 12, 2015

Rustic Picture Clipboards


Once I saw the post by Love Grows Wild with the DIY PhotoClipboards, I knew I had to have them. 
    
                                                            Learn how to make these gorgeous DIY Photo Clipboards at LoveGrowswild.com:
I had the perfect place for them – the beadboard wall in the kitchen had a small shelf begging for adornment, as seen here in the listing photos.   

Photography credit: Jaime Gervasi & Associates of Long & Foster Real Estate

I always strive to add accessories that are both functional and beautiful, especially so that my boyfriend cannot veto them or dismiss them.  (My one weakness is pillows; however, his cats love my pillows and lay all over them so the boyfriend is outnumbered on this one.)

I bought one board (60 inches long, 12 inches wide, 1 inch thick) from Home Depot and had them cut it into 5 pieces, each measuring about 12 inches.  I then sanded the corners and stained them, using the same Miniwax Dark Walnut stain I used for the “DIYWooden Desk Top” post.  I liked how the stain looked after one coat – the wood seems to really just soak it up like water.  I then added the same Miniwax Low Gloss Finishing Stain that I also used on the desk.  

Here are some pictures of the boards in varying stages of the process:


I then glued on these clips, purchased on Amazon.  I really really wanted to purchase the pictures from Love Grows Wild, as they are beautiful and I know I do not have that skill level yet.  Recently, the boyfriend and I have been experimenting with Blue Apron.  He loves it, and I love anything that inspires him to cook and allows me to eat.  :)   Seriously, I think he cooked 3 meals the other week.  My quality of life is just going up and up and up!  We have been keeping the recipes we like with plans to reproduce them on our own.  I took a few of our favorite recipes and put them on the clipboards, with the hope that seeing these yummy meals would inspire a trip to the grocery store.  

Here is the finished product:


Spray Painting Glass Vases


Hi everyone,

I know I haven’t posted in a while, but I had a busy few weeks of medical boards (I passed!), grant applications, and time on service.  There have been no shortage of new house projects in the interim, but I haven’t had the time to post anything until now.

We have been busy trying to put the finishing touches on different rooms.  In our old house, the living room color scheme was green and yellow, which was the color scheme in my previous apartment as well.  The boyfriend liked it, but I was ready for a change.  We decided on a scheme of blue, gray, and white for the living room.  I prefer neutral walls and furniture with pops of color in the accessories (rugs, vases, pillows, etc.) so that I can reuse the larger and more expensive pieces and replace the smaller objects over time.

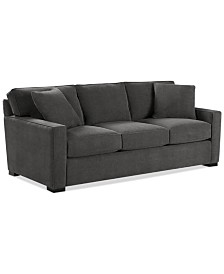
We were able to find a great grey couch on sale at Macy’s and an appropriately sized and priced blue rug at Target that we both agreed on.  I had a blue color scheme in the guest bedroom of our last house and my previous apartment, so I decided to use the same pillows in the living room.  The boyfriend felt that they were more of a “teal” color, but I disagreed.  We reused my tv stand (Value City Furniture) and book shelf (World Market) purchased years ago.
Radley Fabric Sofa
Radley Fabric Sofa - www.macys.com


We are still working on the wall décor.  We found a really nice clock on Amazon that seemed to fit with our plans.  I also found a Groupon for canvas photos and decided to immortalize the cats on the wall.  The boyfriend, for the record, vehemently disagreed with this plan, as he felt it made him look like a “crazy cat man” so I take full responsibility.  I had several great photos of Rey, who is very picturesque.  Unfortunately Bob and Nonna are terrified of me so their photo sessions were less than ideal.  These are the same pictures used in my “Who am I?” post, now immortalized forever on canvas prints.  We hope to add to the wall over time with other interesting finds.

Next, I needed to reuse my now obsolete beautiful green and yellow accessories in the new house.  I got these tall green vases at Home Goods a few years ago and they have served me well.  I couldn’t reuse them in other areas of the house, so I decided to spray paint them white.  I looked at a few tutorials on Pinterest, and this one by LiveLoveDIY seemed the most applicable to my situation.

                                                             10 Paint Secrets: what you never knew about paint (like how to spray paint glass!). This is GREAT!:

First I washed and dried the vases to remove dust and grime.  I then used the same spray paint as the blog referenced above, Rust-Oleum High Gloss White.  I let the vases dry for a day and then moved them upstairs next to the TV, where they previously lived.  I also spray painted a smaller vase blue using Krylon Ocean Blue to add some variation to the color scheme.   

Here are the original vases:


Here is the finished product:


I absolutely love how they look!


Friday, October 23, 2015

Craiglist console table


Hi!

The desk project inspired us and we've been hard at work revamping the first piece of furniture we bought for the new house: a console table.  Our realtor cautioned us not to buy any new furniture until the papers were signed.  I waited and waited and waited and finally the week of closing bought this teal console table with great curves off Craigslist for $60.
 

At pickup, the seller let me know that the table only had 1 drawer, an immediate downer.  I was already in love so I bought it anyway.  When I brought it home, my boyfriend went into "super critical mode" and declared that he hated the wooden table top because of the small army of poorly placed screws.  After a small spat, we agreed that the table top and terrible hardware would have to be changed.

Once I decided that the living room color scheme was going to be blue, gray, and white, I realized that the teal (my favorite part of the table) would have to go.  I already had some gray paint that I didn't end up using for another project, so we went with that.  Next we set to work deconstructing the table.  We started with the 7 million screws in the desk top.  I was able to get out most of them with a manual screw driver and a drill.  My boyfriend removed a few remaining ones with some "special" drill techniques.  And for the 2 or 3 that we stripped or that were buried too deep, we were able to rip off the boards despite their presence.  I used a putty knife to pry off the fake drawer fronts.  We then used a jigsaw to cut out the inserts for the new drawers, slightly smaller than the drawer fronts.  We screwed together a few leftover pieces of wood to make small drawers and glued the drawer fronts to them.  Here it is in various stages of deconstruction:


Next we set to work on the new table top.  While I had hoped to salvage the original boards, they were simply destroyed.  So back to Home Depot.  This time I got some nice poplar 5.5 inch wide by 4 feet long 1/2 thick boards ($8 apiece).

The boyfriend and I had some disagreements about what to stain the boards.  I wanted to stain them the same dark walnut as the desk, particularly since I had plenty of stain leftover.  He wanted a lighter look, even considering whitewash, which I know he hates.  We agreed on a weathered gray look.  I did have some concerns about the contrast between the boards and the gray table, so I did a layer of whitewash as well.

I looked at several tutorial on Pinterest before decided on a stain and technique.  This one from AKA Design came the closest to what I was looking for but these other tutorials from Owen's Olivia and Ella Claire had some great suggestions as well.  Ace Hardware only had Miniwax Classic Gray in stock.  I wiped a small amount on the boards with a towel and it was super easy and already looked great.  I wanted a bit more depth as well as contrast, so I did a layer of whitewash as well.  I mixed 1 part white paint and 2 parts water and wiped it on with a towel.  It dried very quickly so I only used a little at a time, as suggested by Owen's Olivia above.  I then sealed it with the same Miniwax Low Gloss Stain wiped on, also used on the desk.  It really makes the surface smooth without too much gloss or change in the color.  Here are some pictures of the process:

                                      Left board - stain only            Right board - stain and whitewash


All three boards with stain and whitewash


We reattached the original tabletop (upside down so that the crown would rise up and out to meet the boards and screwed in the boards from underneath.  The boyfriend had a real problem with any screws showing on our fabulous new desktop, but I felt that a few symmetric screws would be ok.  He won this round though.  I sanded the corners and edges after the boards were attached.  Here are a few close ups.


Finally, the pulls.  I found some decent ones on Amazon for a great price that came with screws of different links.  I might replace them with some patterned blue ones after some searching at Anthropologie.  Any floral ones were immediately vetoed by someone else in the home.  The boyfriend screwed them on while I was at work.  Pretty good for our first furniture buy for the next house.  Voila!


A close up of the pulls
 

Bob already likes it.  :)


Wednesday, October 14, 2015

DIY Wooden Desk Top


Hello there.

I think we've gotten to know each other well enough that I can share my first big DIY project with you in the new place.

In our old rental, I had a separate room with a door for my crafts and office stuff.  I would leave the door open when I was working on things from time to time, and the cats would come in, explore, and leave me in peace.

As you will see from these pictures from the original listing, in the new place, the layout is a little more...open.  The office is between the bathroom and the front bedroom.  The rest of the house was beautifully decorated by the previous owners, but the office space felt a little too modern for me.
Photography credit: Jaime Gervasi & Associates of Long & Foster Real Estate


So now that the cats can enter my office space at any time, furniture that is a little more "cat-proof" is needed.  I already got an all seasons cover for the white ottoman. It is ugly but it keeps the cat hair and cat vomit away.

I then started working on a desk.  I really wanted a custom wooden desk top for the space that would stretch across the entire back wall.  Boy, was that expensive.  But they were so pretty - see this one from Etsy.  So I decided to make my own.


Pinterest to the rescue!

I followed directions from Lindsey Stephenson's blog for the wooden desk top and used materials from IKEA as suggested by Bryn Alexandra (love the inspiration picture!).

Quick trip to IKEA for the cabinets and Home Depot for wooden boards for the desktop.  I had HD cut three 10 inch width by 10 feet long boards in half (approximately $15 apiece).  The boards were already sanded and planed.  We decided to make two desktops for the entire space for easier building, transport, and future removal purposes.

Here are the original boards:


They were still a little uneven even though we had them cut at the store.  Instead of having them cut in half, we should have had them cut them to 60 inches.  Anyway, I sanded the boards down.  I only sanded the corners since the boyfriend wisely suggested that I might want the boards to fit together flush and sanding the edges may have caused a slight gap between the boards.
                                                                 
                                                          Before:                     After:


Next, I stained them using Miniwax Dark Walnut stain.  I used a brush but in the future I will definitely wipe the stain on.  I put on too much in places and did not wipe it off in time.  It took forever to dry, especally on the edges.  Lesson learned.  Still looks great though.  I like the variations in color.

I put together the IKEA cabinets and put them into place in the office.

Then I brought up the stained boards.  We bought some additional wood that I tested the stain on and used that to screw the boards together.  I did need a little extra boyfriend elbow grease to hold the boards together as the screws needed to be as tight as possible to stop any movement.  We did a dry fit and then screwed everything into place.

We lined up the "cleats" with the drawers so that the board would not move size to side.  The boards were also flush with the wall so they are pretty stable in that way.  If it's too mobile, I will do as the other blogs suggested and screw the boards to the cabinets.  It's good for right now though.  I also added some Miniwax Low Gloss Finishing Stain.  It didn't change the color or gloss at all, but it made the surface feel smoother and was easy to apply and quick drying.

Here is the finished product!


And the boards up close and personal:


Catproofed! Now all of my office supplies are behind closed doors.  I am still working on styling the desk, the bookcases, and a few other projects in there.  Very excited to share the finished space.