Search This Blog

Sunday, September 20, 2020

New Baltimore house Kitchen Nook

Hello there!


If you've been following the blog, you know I'm a bit of a sucker for a kitchen nook.

See partial shot of kitchen nook with bistro table and clipboards inspired by Love Grows Wild from this post from the original Baltimore house.


And shot of the kitchen nook in the Silver Spring suburban house from this post.


I basically transplanted the kitchen materials to the new house, and things fit almost perfectly in the designated nook area.


The red kitchen shelf fit really well between the outlet and the corner.  But the red scheme didn't see to work as well in this kitchen with the...white...puffy flower...wallpaper, a fact made glaringly obvious by the bookshelf.  The other reds in the room, the pillows and the rugs, were more muted red, which still worked in the room.  The shelf was not even sold in red any longer, so I would either have to spray paint another one red or a different color.

Luckily, the shelf does come in white.  Which would coordinate well with the puffy white flower wallpaper but also...COVER IT UP A LITTLE.  Reasonably priced, with two flanking the window.


I'm thinking I will hang a curtain over the window to make the shelves seem more symmetric and to cover the wallpaper even more - the window is not centrally placed between the wall and the sliding panel doors.  I would LOVE to replace the light fixture, but I'm probably not going to be allowed to do that within budget/reason/hubby says no. It's just too much wallpaper to cover with peel and stick/other wall covering options so I need to work with it a little.

I will get that landline phone off the wall.  We're already using the shelves for our backup computers and I plan to put a printer there somewhere for easy access - will wait for sales.

I will put the final pictures in another future post.

Bye for now!

E

Sunday, September 13, 2020

Wall Decor in Living Room and Master Bedroom

Hi,


Attempting to post quality content more often, as promised.

Nothing makes a new home, particularly a rental home, feel more familiar than when you put stuff on the walls.  Just about anything will help it feel less like someone else's home and more like your home.  Still, a lot of times I wait and wait and wait (and pretend like I'm going to buy new artwork and finally print out our wedding photos) and stuff doesn't go up.

In the last house, the Silver Spring house, I put up all our wedding signs about 10 seconds before we had the in-laws over for Christmas, 9 months after we moved.  It worked for that time, but I was hoping for something a little more varied (I wanted to say personal and room specific, but I think our wedding signs are pretty personal) this time around in the different rooms.  I tried to focus on the rooms we used the most, which were the living room, master bedroom, and guest room/office.

Living Room Gallery Wall

If you remember, I did a gallery wall two homes ago, in the Baltimore House.  I used the same artwork in the Silver Spring suburban home, but just hung it in a line across the wall.  It was fine for the space, but I don't have any pictures of it.  I had thought about adding a picture rail there, but that living room space was so small, it just wasn't inspiring to me.

Living Room in Baltimore House

Once I set up the living room in our new home, I thought a gallery wall would again best utilize the space between the two flanking bookshelves.  It's a pretty big wall and it needed something to distract from the television.

This time, I decided to try things a little differently.  Nobody wanted to fill nail holes and search for matching paint again when we moved out.  I still laid everything out on the table and moved things around until I had a layout pleasing to MY eye.  I let our roommate and the hubs vote too.  I hung the pictures using the Command picture and frame hanging strips.  I hung up the first picture in the middle, making sure it was level and following the strips directions.  Then I left it up and hung up a picture on the left and right of the center picture, making sure they were level with the center picture.  Every time I put up another picture, I took the other picture down as it was no longer needed to measure for level.  The Command strips suggested waiting an hour before using the strips, which is why I took the other pictures down.  I only used strips at the top for the lighter pictures.  Heavier pictures needed top and bottom frame strips.  Here is a picture of all the strips in place.


The directions were basically attach one strip to the back of the picture, then attach the sister strip via velco, then press it to the wall.  Everything required being held down for 30 seconds.  Then the sister strip would stay in place on the wall and the original strip stayed in place on the back of the picture.  This didn't always happen quite as described.  Sometimes the original strip would come off and stay on the wall.  Sometimes the sister strip wouldn't stay on the wall.  But after a few tries, I got the hang of things.  I also loosened the sister strip a little before pressing the picture to the wall, so it would detach easier from the original strip. I also noticed paint did come off of the wall in one place when I had to reposition a strip.

After the hour long wait, I put the pictures back in place.  I measured each picture for level, but they were so close together, it was easy to adjust the pictures without changing the velcro strips.


I'm almost done in the living room, so will hopefully do a post of the sources in there soon if you're interested.  In the interim, feel free to drop any questions in the comments.

Master Bedroom Wood Carvings and Shelves

Similarly, I've been collecting these wood carvings from World Market since the very first Baltimore house master bedroom redo.


Over the years, I've collect a few more to fit the walls better, but I've always liked how they look above the dresser in our master bedroom space.  So when it came to the new house, I wanted to go with an old favorite.


We also have some nice built ins in the bedroom, providing an opportunity for some decorating.  I combined our old lanterns and some wedding shadow boxes below.


To hand these wood carvings, I used a level with the help of my roommate to hang a strip of tape along the wall over the dresser.  I then measured things out to perfectly space the wall hangings across the dresser.  I put a similar piece of tape above the first piece for the upper row of wall carvings, though I took some time to decide what height I wanted them at.  From here, I again used the Command picture and frame hanging strips to put there up, as they are pretty light.  I like that the strips don't show behind the pieces, which took some creative strip placement.


Anyhow, getting started on fall decor here along with decorating the new house.  So you'll probably see what I've got going in a few posts.

See you soon,

Monday, September 7, 2020

DIY Ceiling Lampshade

 Hi guys,


So I've got a slew of projects I'm almost ready to share, thanks to the new "Project House" we're renting.  I'm really trying to post things more regularly as I complete both small and big projects and I'm definitely keeping you updated on Instagram more regularly than the blog, if you want to follow me there @agirlandsomepaint

Anyway, I've been doing day in/day out Zoom meetings for work while at home and I have been trying out different spaces to have these meetings.  I primarily use the kitchen nook right now as it has the best overhead lighting and I just close the window blinds behind me and try to limit how much people can see of the...not so great but not terrible enough to cover wallpaper in kitchen. 

And no, that phone does not work (I think) and I do plan to remove it and I do have a plan for this space, with white bookshelves flanking the settee to block some of the wallpaper and a curtain, but it's not a priority space.

I also have my basement office which I use when I need extra privacy for work.  That space is still coming together and I have a cardboard backdrop that I occasionally use for the space when needed, that will need to be...prettified.  And it's cold down there and far away so I prefer using the upstairs space for more informal work meetings and less intense work.

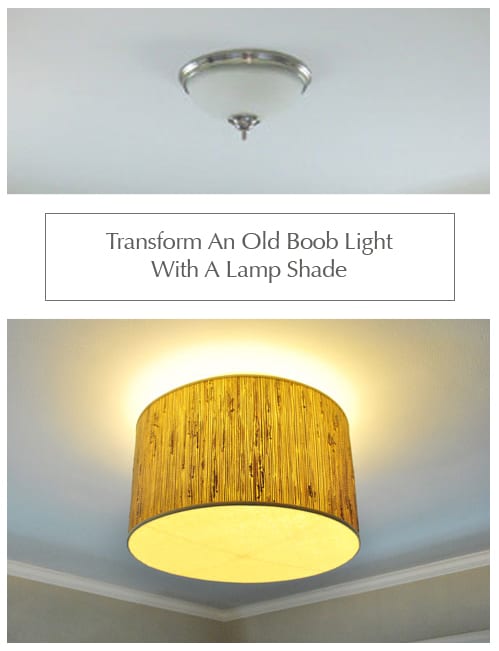
Before I was using the kitchen nook and the basement, I was using the guest room/office/workout space when we first moved in.  It had terrible overhead lighting that created a lighting "halo" that made me really hard to see and was distracting.  And...its the room with the cork wall backdrop, the ugliest thing I've ever seen.  I have a plan for THAT, but it's not ready yet, but I decided to go ahead and tackle the lighting issues.  Our new roommate was also using this room a lot for his workouts and online classes, so I figured this would be a nice upgrade for him too.


I don't really understand the point of this light's "box".  It was ugly, not functional, and did nothing for the lighting.  The naked bulb would've been an improvement, except the halo effect was still present in my Zoom meetings.

So then...a few Pinterest tutorials later...I went with my go to people, Young House Love.

transform-an-old-boob-light-with-a-lamp-shade
https://www.younghouselove.com/office-progress-let-there-be-light/


I Immediately found the right size lampshade at Home Goods and it perfectly matched some fabric I already had on hand.  I cut it to about a half inch overhang and put glue around the edge of the lampshade first and then the sides of the shade and folded up the fabric.  


However, my shade didn't have a fabric edging like YHL's did and I couldn't glue it to the inside, so I had to figure out a creative way to cover the extra fabric that would look good with the fabric and cover the glue.

First, I tried cheap white ribbon.  The glue showed through immediately.  A second layer of ribbon looked even worse.  The hubby gave his usual immediate negative feedback when I was trying to hang it up with him, and I was done with that.

Next, I tried wasi tape.  I had a ton leftover from my mirror project (link here) and decided to try some really pretty copper tape that looked great again the fabric.  It stayed put nicely and covered up the glue just fine.  I did a couple of levels and then used a thin strip of the tap to do a little detail work at the middle and top.  The hubs and our new roommate both thought it looked great.


Next, I had to try to hang it up.  The lampshade was truly meant for a lamp, not a ceiling, and had metal bracing around the bottom side, which meant I had to glue fabric on that side of the shade because it wouldn't fit around the bulb.  I tied fishing line to the bracing and then made a loop to the bracing on the same side of the shade, so that I have two loops.  Then I just shortened the loops until the lamp was the right height to cover up the white holder for the last shade and looped them around the holder.  Secure, removable, and the perfect height.  The lampshade is so big that the fabric has plenty of room between it and the bulb and shouldn't get too hot.


I'm considering either thicker white ribbon or white tape, but I'm loving the look for now.  Although I'm not sure I love how it looks at night yet.  Anyway, the actual point is that the overhead lighting is now much better.  The hubs thinks its mood(y) lighting, but you can turn on the other two lamps in the room if you need more light and the room has two large windows as well, which make bright enough to work in during the day but pleasant enough to just hang out with the overhead light on after dark.  I no longer look like a fuzzy distracting angel in my Zoom meetings.


Anyhow, I'll try to keep it coming with the projects somewhat regular for a little while.  But the gram makes it so easy...

-E