Search This Blog

Sunday, September 22, 2019

Bathroom Medicine Cabinet Updates

Hi everyone,


Conference season has started, but I'm really hoping to have regular content for you as the weeks fly by.  Work is busy in a good way, but that means less time for room designing and furniture refinishing. 
:(

Today's post is about a project I started because our surburban house has really old medicine cabinets that had started to deteriorate over time.  The guest bathroom was the worst offender.


The metal had started rusting and was not really cleanable.  I had decided to spray paint it after reading a few tutorials, like this one from Space For Living Organizing and this one from The Handyman's Daughter.  The hubs was worried about overspray and I had started to design a spray tent using a garbage bag, but with my niece's visit looming, I decided to paint it by hand.  I did try to clean off the rust first using a brush, but it really was a lost cause.

After a few coats of paint, I was pleasantly surprised by the end result:


100% better and ready for my niece's visit!

Next, I decided to tackle the cabinets in our master bathroom.  These were also starting to show some wear, tear, and rust.  It was also clear that someone had noticed this issue and tried a little peel and stick solution at the bottom, that really wasn't working anymore.


Still, the sad little islandy wallpaper peel and stick bottom above gave me some inspiration, along with tutorial from Design Improvised and Young House Love on how to install peel and stick wallpaper.  I REALLY wanted something bright and flowery for the cabinets, but I knew the hubs would veto everything, so I decided to surprise him with some cherry blossom themed paper he just couldn't resist.  I think the paper has just a hint of pint that goes really nicely with the color on the wall.


After measuring, cutting, and then measuring and cutting a little more, I was able to get everything in pretty easily.  I had a lot of extra paper and also cut panels for the top and bottom of each cabinet.


I did the same to the hubs cabinet, but his is still pretty crusty on one side, so I only took pictures of mine.  I also didn't want to take down and put back up all his medicine cabinet stuff again.  Sigh.

We did a few additional changes to this bathroom, moving some of the towel bars and adding some removable storage.


I got the wood and metal tiered tray on the counter top from World Market.  It provides some additional multi-level storage for the counter top and is super cute!  It might be considered...slightly farmhouse, but I don't care.


 I got the shelving from TJ Maxx (couldn't find online) and the baskets from Amazon that fit perfectly.  They have super cute little rope handles and are so cute.  The baskets hold bathroom supplies, cleaning supplies, and the hubs' pajama pants.  It fits so well in the corner and doesn't take up a ton of space.


Boom.  I'm not sure how much longer we'll be in this house, but I'm enjoying improving its aesthetic and function for the way we live.

Bye for now!
-E

Saturday, August 31, 2019

Dining Room Mirror Update

Hi again,


Trying to make up for lost blogging time with a slew of posts before conference season gets in full swing.

Below is a picture of my very first DIY project - an IKEA mirror that I painted white and added tiles too, to mimic a mirror I couldn't afford.  It's been years and its (partially) survived a lot of moves, though I did have to replace the inner mirror a few times - shout out to Dulles Glass and Mirror, they have the best variety of custom mirror sizes at in stock prices and high quality shipping!
 

Anyway, some of the tiles had been hanging off for a while and I just didn't like the look of the mirror.  It didn't help that we hung it WAY too high and my husband didn't really want to move it again (yeah, I'm going to blame him, but really, it was heavy and I didn't really want to move it again either).  So...I started to source new mirrors and came across this one from Pottery Barn.


Beautiful, right?  But the price?  No.

So, I decided to make my own.  I threw out the mirror frame, but the mirror itself was still perfect for the wall, so I wanted to still use it.  I wasn't sure if I wanted silver or bronze for the frame, so I decided to start with using Wasi tape on the mirror.  I liked the look of it so much, I decided to stick with the Wasi tape and not do framing AT ALL.  I did have to source Wasi tape from multiple JOANN's who seemed to be the only place that had the metallic Wasi tape in a muted gold/bronze that the hubs and I could agree on.

Next we had to figure out how to hang the mirror with no backing.  Easy peasy - mirror clips from Home Deport.  We got two packs, for four on the bottom and four on the top, because this mirror was HEAVY.  Here's the final product!


I'm wondering how the Wasi tape will hold up over time, so I'll keep you updated.  On to the next one!

Entryway Updates

Hi everyone,

It took a while, but I'm back with a few small projects for you to check out.  We've had a slew of family visitors this month, so I've been a little slower with the posts, but the projects have been rolling along.

First up, a small entryway update.


The hubs wanted a little more freedom to move into the living room and dining room from this small hallway leading to the kitchen.  Of course, I forgot to take pictures of everything before I moved everything and sold it.  I previously had our dining room console table from Target and the teal green mirror from the Baltimore house here, and he felt that the console table was a little too wide for the space.  He wasn't wrong, but the console table functioned as a organization station, for mail, keys, and storage.  I wasn't sure we would be able to get the function we needed from a smaller table.  Here's the mirror below, but we used a different console table with it, pictured right below that picture.  We sold both items pretty quickly on LetGo actually, which I was happy about.  But that meant it was time to find a new table.


I wanted very specific dimensions for the new table as well as a wood and metal look, similar to the previous table.  I did a lot of online shopping, but couldn't find a table that met both the dimensions and the look I needed.  So we went shopping for something custom on Etsy.

Etsy show Gokojo had EXACTLY what I was looking for in terms of look and was able to work with me on the dimensions AND the color to match some of the wood tones we already had in the room, something I totally was not expecting.  We went with the Reclaimed Wood Console Table - Lentini Design, in a custom color somewhere between slate and provincial.  I sent the shop owner pictures of the other wood items in the living room and he was able to match the wood stain from the pictures.  Truly amazing!

Gokojo Etsy Shop Image

Next, I sourced a gold mirror from LetGo for $15 - the seller was in Virginia but agreed to meet me in DC early one weekend morning.  It had a little arch and a little detail.  I touched up the spray paint with some gold from my own stock.  I had to do some touch up paint on the wall to, before adding our clock from Amazon, which changes time automatically for Daylight Savings and looks so classic.


So...right after I took these pictures, I was reviewing them and noticed how prominent the HVAC vent was in the photos.  I pointed it out to the hubs, who had also noticed, and thought it was because the previous table was so much wider that you couldn't really see the vent as easily so we never noticed it.  Let's chalk this up under "incidental design problems when you try to change small things".  

So I did a little online search and found a few Pinterest tutorials for how to cover unsightly vents.  This one by Simplicity in the South seemed to fit the bill for what I was looking for - simple and cheap.

I went to Home Depot and found the things I needed - metal decorative radiator screen, white spray paint, and wood trim.


We don't have a table saw, so I had to cut 45 degree angles on the small trim using a hand saw, which worked well once I came up with a system.  I taped off the edges of the screen, because it was pretty sharp.  I then spray painted everything white and joined everything using glue and clamps to let it dry for 24 hours.  After drying, I gave it once more round of spray paint and then added wood filler to the edges.  There are some minor imperfections but give where the screen is hanging, it looks good enough for now.  We hung it up using velcro strips so we can take it down when we leave or if work needs to be done on the HVAC.


And now the entryway is DONE!  Just in time for our last summer guest, my father and brother.  My brother has mobility issues, so the larger space in the entry was perfect for him.  We were able to move the organization station and storage items to the storage console behind the couch - hopefully will be able to show you living room pictures next time the house gets cleaned.  But I'm loving the new look of the house entry point and hope you do too!


You got a little sneak peak at the next project in this post - I finally updated our dining room mirror, my very first DIY project.  Can't wait to share that with you soon.  Happy end of summer!

E

Sunday, July 28, 2019

Outdoor spaces

Hi everyone,

June and July have been packed with vacations, deadlines, and emergency medical issues.  What a summer!

Anyway, I've been putting some pictures up on Instagram, as we've revamped the outdoor spaces in the suburban rental house.  The house is in front of a small wooded area and creek, which means lots of bugs in the back, which we're still trying to combat.

We still miss our actual front porch from the Baltimore house, as opposed to this "stand there, be covered, and fumble with your keys" area outside the front door.  Still, I wanted to add some homeyness and charm to the outside of the house and make it feel more welcoming.


I got the multi-colored welcome mat from Kohls on sale.  The black mat was leftover from the owners who had a similar smaller welcome mat on top, that was becoming weathered.  I added the boxwoods last year and the "hello" wreath earlier this year.


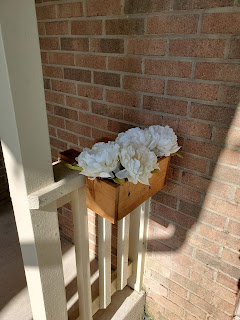
Next, I added planter boxes from Etsy.  The maker advertised "custom" sized rail hangers, but they were not the proper size and the hubs had to do some wrangling to get them to fit.  So I wouldn't recommend them and won't link there here.  


After two rounds of killing plants, I added these faux flowers from Michaels, just in time for our summer party!


On to the backyard!

I wanted some string lights and additional seating out here.  I was able to follow this tutorial from Martha Stewart with the pots coming from Michaels and the rocks and posts coming from Home Depot.  We did drill some drainage holes into the bottoms of the buckets for water drainage and sprayed the posts with some weather protectant to keep them from warping and rotting.  A lot of people on Pinterest and Instagram did concrete versions - we are renters and need to be able to move and reuse these buckets.

We next added white hooks to the top of the staff.  Then we filled the bucket about 1/3 full of rocks, put the post in place, and added rocks up to about 3/4 full.  We still felt like they were unstable and tied them with fishing string to the porch.  One of the posts is starting to lean, but the other ones seem stable.


Next, we got a BARGAIN on a huge umbrella with netting on LetGo.   And I finally gave away the white rocking chair and replaced it with another Adirondack chair from World Market.  We also got these mosquito repellents and a huge bug zapper from Amazon.  With those additions, I am only minimally getting "zoomed" by wasps and bees, but I think the mosquitos are staying away.  I would like to add some lavendar, citronella, and other repellant plants in the future.


So these are our outdoor spaces.  The lower deck is more for storage though we have our old bench set up down there for when we have people over.  I should have an entryway post coming soon and then maybe some shots of the living room as well.

Hope your summer is less eventful than ours.  Bye for now!