
Hi,

Attempting to post quality content more often, as promised.
Nothing makes a new home, particularly a rental home, feel more familiar than when you put stuff on the walls. Just about anything will help it feel less like someone else's home and more like your home. Still, a lot of times I wait and wait and wait (and pretend like I'm going to buy new artwork and finally print out our wedding photos) and stuff doesn't go up.
In the last house, the Silver Spring house, I put up all our wedding signs about 10 seconds before we had the in-laws over for Christmas, 9 months after we moved. It worked for that time, but I was hoping for something a little more varied (I wanted to say personal and room specific, but I think our wedding signs are pretty personal) this time around in the different rooms. I tried to focus on the rooms we used the most, which were the living room, master bedroom, and guest room/office.
Living Room Gallery Wall
If you remember, I did a gallery wall two homes ago, in the Baltimore House. I used the same artwork in the Silver Spring suburban home, but just hung it in a line across the wall. It was fine for the space, but I don't have any pictures of it. I had thought about adding a picture rail there, but that living room space was so small, it just wasn't inspiring to me.
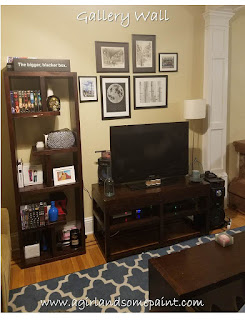
Once I set up the living room in our new home, I thought a gallery wall would again best utilize the space between the two flanking bookshelves. It's a pretty big wall and it needed something to distract from the television.
This time, I decided to try things a little differently. Nobody wanted to fill nail holes and search for matching paint again when we moved out. I still laid everything out on the table and moved things around until I had a layout pleasing to MY eye. I let our roommate and the hubs vote too. I hung the pictures using the Command picture and frame hanging strips. I hung up the first picture in the middle, making sure it was level and following the strips directions. Then I left it up and hung up a picture on the left and right of the center picture, making sure they were level with the center picture. Every time I put up another picture, I took the other picture down as it was no longer needed to measure for level. The Command strips suggested waiting an hour before using the strips, which is why I took the other pictures down. I only used strips at the top for the lighter pictures. Heavier pictures needed top and bottom frame strips. Here is a picture of all the strips in place.


I'm almost done in the living room, so will hopefully do a post of the sources in there soon if you're interested. In the interim, feel free to drop any questions in the comments.
Master Bedroom Wood Carvings and Shelves
Similarly, I've been collecting these wood carvings from World Market since the very first Baltimore house master bedroom redo.

Over the years, I've collect a few more to fit the walls better, but I've always liked how they look above the dresser in our master bedroom space. So when it came to the new house, I wanted to go with an old favorite.


No comments:
Post a Comment